Tools Watermark Generator

Watermark Generator

Add a watermark to your photos directly in your browser. Your images are processed on your own device — nothing is uploaded to a server, and there is no sign-up and no watermark on the output.

  • Files never leave your device
  • No sign-up, no upload
  • No watermark on the output

AI Watermark Placement — Automatic Position and Opacity

Placing a watermark well is a judgement call that most people make badly. Drop it in the bottom-right corner by reflex and it lands on a face, disappears into a bright sky, or sits on the one part of the frame a cropper would cut off first. Doing it properly means looking at each photo and asking where the image is quiet enough to take a mark without fighting it.

This watermark maker does that analysis for you. Press Auto-place and it samples six candidate regions — the four corners plus the top and bottom centre — and measures two things in each: average brightness and how much that brightness varies. A low variance means a flat, uncluttered area: open sky, a plain wall, a blurred background. That is where a watermark reads cleanly and interferes least with the subject.

Brightness then decides the colour. The tool computes the WCAG relative luminance of the winning region and picks white type over a dark area or black type over a light one, keeping the contrast ratio at 4.5:1 or better — the same threshold used for readable body text. Opacity follows from the same numbers: a high-contrast, flat region needs less opacity to stay legible, so the mark is set lighter and intrudes less. A busy or low-contrast region gets more opacity and an outline instead.

What this is not is a neural network, and calling it one would be dishonest. It is image statistics — a luminance histogram and a standard deviation per region — which is exactly what the automatic watermark placement in every comparable tool amounts to. The advantage of doing it this way is that it runs in a few milliseconds on your own device, needs no model download, and produces the same result every time for the same photo.

Every automatic decision is a starting point, not a verdict. Position, colour, opacity and outline all stay editable, and you can drag the watermark anywhere on the preview afterwards. In batch mode you choose whether to run the analysis per photo — which is usually what you want, since a set of photos rarely has its quiet area in the same place twice — or to lock one position across the whole set for consistency.
Your Photos Never Leave Your Device

Nearly every online watermark tool works the same way: you upload your photo, it is processed on a server you know nothing about, and a privacy policy is all that stands between your file and whatever happens next. For watermarking specifically, that is an odd bargain. The reason you are adding a watermark is usually that the image matters to you — a client shoot, a product photo, artwork you are about to post. Handing it to a stranger first is the opposite of protecting it.

ShotEdit inverts that. The moment you drop a file in, it is read from your disk straight into your browser tab. Canvas draws the watermark using your own CPU and GPU, and the finished image is handed back as a download. Nothing is transmitted, nothing is queued on a server, and nothing is stored — close the tab and every trace is gone from memory. You can confirm it yourself: open your browser's Network panel, watermark a photo, and watch that no request carries your image.

That architecture has practical consequences beyond privacy. There is no upload progress bar, because there is no upload — a 40 MP raw export is watermarked as fast as a screenshot. There is no file size cap imposed by an upload form, only what your device's memory can hold. There is no daily quota, because processing your photo costs ShotEdit nothing. And because the work happens locally, the page keeps working after you go offline.

EXIF metadata is stripped by default for the same reason. Photos from a phone routinely carry the GPS coordinates where they were taken, and a watermarked image is one you intend to publish. If you need the metadata preserved — photographers often do, for authorship fields — there is a switch for that when exporting JPG.

No upload step

Your photo is never transmitted to ShotEdit or any third party.

No account required

No sign-up, no email, no usage counter.

No watermark on the output

ShotEdit never stamps its own logo onto your image.

Works offline

Once the page has loaded, watermarking keeps working without a connection.

Text, Logo, and Tiled Watermarks

Three kinds of watermark cover almost every reason to mark an image. You can switch between them at any point without losing your settings.

Text watermarks

Type your name, your handle, a copyright line or a URL. Nine system fonts cover sans-serif, serif, monospace and display, and you get full control over colour, opacity, rotation, outline and shadow. Multi-line text works — press Enter for a second line, which is the usual way to pair a name with a website.

Logo watermarks

Add a logo watermark to a photo by dropping in a PNG or SVG. Transparency is preserved exactly, so a transparent watermark PNG stays transparent rather than arriving with a white box around it. SVG logos are rasterised at export resolution, which means they stay sharp even on very large images.

Tiled watermarks

A tiled watermark generator repeats the mark across the whole frame at an angle, which is what you want for proofs, previews and anything you expect people to try cropping. Density is adjustable from sparse to dense, alternate rows are offset so the pattern does not form obvious lanes, and the angle is yours to set.

Sizes are set as a percentage of image width rather than in pixels. That is deliberate: a watermark fixed at 48px is unreadable on a 6000px photo and enormous on a 600px thumbnail, which is why batches processed by pixel-based tools come back looking inconsistent.

Batch Watermark Multiple Photos at Once

Add up to 100 photos in one go — by dragging a selection in, by picking multiple files, or by pasting from the clipboard. One set of watermark settings applies to the whole queue, the preview shows whichever image you have selected, and you can drop individual photos from the queue without starting over.

Because sizes are proportional, a batch of mixed dimensions comes out consistent: the watermark occupies the same fraction of every frame whether the photo is 800px or 8000px wide. This is the single most common failure of batch watermarking elsewhere, and it is the reason the size controls here are percentages.

Automatic placement can run per photo, so a set shot in different lighting gets a sensible position and colour for each frame rather than one position imposed on all of them. If you would rather have every image marked identically — usually the case for a product catalogue — turn that off and the position you set is applied across the set.

Processing is serial: one photo is drawn at full resolution, exported, and its canvas released before the next begins. That keeps memory flat instead of climbing with queue length, which is what lets a large batch of high-resolution photos run on a laptop or a phone without the tab being killed. When the queue finishes, download the images individually or take the whole set as a ZIP. Unlike most online tools, batch mode in this watermark generator is free and is not capped by a daily quota.

How to Add a Watermark to a Photo

Three steps, no account and no upload.

  1. 1

    Add your photo

    Drag an image onto the box above, click to browse, or paste from your clipboard with Ctrl+V. Select several files at once to watermark a whole batch.

  2. 2

    Set up your watermark

    Type your text or add a logo, then set the size, colour and opacity. Choose a corner from the nine-point grid, drag the watermark onto the preview, or press Auto-place to have the position and colour chosen for you.

  3. 3

    Add the watermark and download

    Press Add Watermark, then download the result as PNG, JPG or WEBP at the original resolution. Batches can be downloaded as a ZIP.

Image Formats This Watermark Generator Supports

The watermark generator reads the formats below and exports to PNG, JPG or WEBP at your original resolution — no downscaling and no platform watermark.

JPG

Photos from cameras and phones. Exports without transparency.

PNG

Screenshots and graphics. Transparency is preserved end to end.

WEBP

Modern web images, with or without an alpha channel.

BMP

Uncompressed bitmaps from older Windows software.

HEIC

iPhone photos, decoded in the browser before watermarking.

GIF

The first frame is watermarked and exported as a still image.

TIFF opens natively in Safari but not in Chrome or Firefox, which have no TIFF decoder — convert those to PNG first. Transparency survives the whole pipeline as long as you export to PNG or WEBP; JPG has no alpha channel, so transparent areas are flattened onto white.

Watermark Opacity, Size and Position — What Actually Works

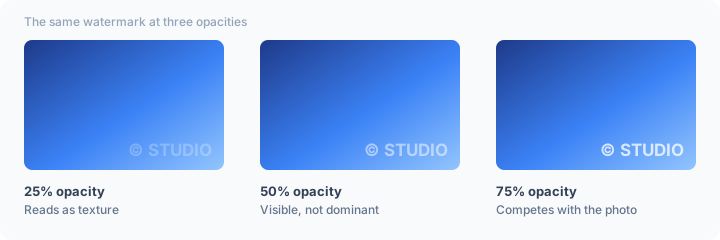
Watermark generator diagram comparing the same photo with a watermark at 25%, 50% and 75% opacity
The same mark at three opacities. Below about 30% it reads as texture; above 70% it competes with the image.

The question people ask most is what opacity a watermark should be. The honest answer is that it depends on what the watermark is for, and the two purposes pull in opposite directions. A mark meant to signal authorship on work you are happy to have shared should sit around 30–50% opacity: visible when looked for, ignorable when not. A mark meant to make an image unusable until someone licenses it belongs at 60–80% and across the middle of the frame, because a discreet corner mark is trivially cropped away. Choosing 50% for both is the common mistake — too heavy for a portfolio piece, too weak to protect a proof.

Size follows the same logic and should always be expressed proportionally. A text watermark at 4–6% of image width reads comfortably on a phone without dominating the composition; 8–12% is assertive; anything above 15% has stopped being a watermark and become a caption. Logos usually want 12–20% of image width, since a logo carries its meaning in its shape and needs more area than type to stay recognisable.

Position is where cropping enters the picture. Corners are the least intrusive and the easiest to remove — a 5% crop takes a corner mark with it. Anything you genuinely need to survive redistribution has to overlap the subject, or be tiled. That is the whole reason the tiled mode exists, and why proofing services have used tiled marks for decades despite how ugly they look.

Contrast decides legibility, and it is the reason automatic placement measures luminance rather than guessing. White text over a bright sky is invisible; black text over shadow is invisible. If your watermark must sit in a specific place regardless of what is underneath, turn on the outline: a contrasting stroke keeps type readable over any background, which is why broadcast subtitles have always used one.

On format: export to PNG when your watermark has soft edges or transparency and the file size does not matter, and to JPG when it does — the difference on a large photo is often several megabytes. WEBP sits between the two, keeping transparency at roughly PNG quality for a fraction of the size, and is supported by every current browser. If you are publishing to a platform that re-encodes uploads anyway, which is most social networks, exporting JPG at high quality loses nothing you would notice.

Browser-Based Watermark Tool vs Upload-Based Tools

Both approaches put a watermark on your photo. What differs is where your file goes to get there — and what the free tier costs you. A browser-based watermark generator does the work in your tab; the alternative does it on a server after you hand the file over.

ShotEdit Typical upload-based tool
Where your photo goes Stays on your device Uploaded to a remote server
File size limit Limited only by your device memory Often 5–25 MB on the free tier
Watermark on the output Never Common on free tiers
Batch processing Up to 100 images, free Usually a paid feature
Output resolution Original, never downscaled Often capped on free plans
Sign-up Not required Frequently required
Cost Free Free tier plus paid upgrade

Watermark Generator FAQ

Is it safe to upload photos to watermark websites?

It depends entirely on the site, which is the problem — once a photo is uploaded you are relying on a privacy policy you cannot verify. Free tools have to cover their server costs somehow, and the terms of service on several popular ones grant broad licences over what you upload. ShotEdit removes the question by never uploading anything: the watermark is drawn in your browser, on your device. You can verify that claim yourself in the Network panel of your browser's developer tools.

How do I add a watermark to a photo without Photoshop?

Open this page, drop your image in, type your text or add a logo, and download the result. Nothing is installed and no account is needed. For a one-off mark this takes about fifteen seconds; Photoshop only becomes worth opening when you need the watermark to interact with the image — blend modes, masks, or an effect matched to the lighting of a specific shot.

What opacity should a watermark be?

Around 30–50% for an authorship mark you want visible but not distracting, and 60–80% for a proof or preview you are deliberately making less usable. Lighter than 25% tends to vanish on busy images and survives a screenshot poorly; heavier than 80% competes with the photo itself. Auto-place sets the opacity from the measured contrast of the area it chooses, which is a reasonable starting point in either direction.

Does a watermark protect copyright?

A watermark does not create copyright — in most countries you hold that automatically from the moment the work is fixed, watermark or not. What a watermark does is provide practical deterrence and attribution: it makes casual reuse less attractive, and it keeps your name attached when an image is shared onward. It is also worth knowing that removing or altering copyright management information, which a visible watermark can constitute, carries its own liability under laws such as the DMCA in the United States. None of this is legal advice, and it is not a substitute for registration where your jurisdiction offers it.

How do I remove the background from a watermark logo?

If your logo is a JPG it has a solid background baked in, and pasting it onto a photo will show as a white box. Run it through the ShotEdit background remover first and save it as a PNG, then add that PNG here — transparency is preserved through the whole pipeline. Logos supplied as SVG are already transparent and need no preparation.

Can I add a watermark to multiple photos at once?

Yes. Add up to 100 images and one set of settings is applied to all of them. Because sizes are percentages of image width, a batch of mixed dimensions comes out visually consistent instead of having the mark look huge on small files and invisible on large ones. Automatic placement can run per photo, and the finished set downloads as a ZIP.

Will the watermark generator reduce my image quality?

The image is redrawn at its original resolution and never downscaled. Exporting to PNG is lossless, so the only pixels that change are the ones under the watermark. Exporting to JPG or WEBP re-encodes the photo, which costs a small amount of quality at the default setting — raise the quality slider if you are working from an already-compressed original, where a second round of encoding is most visible.

Does ShotEdit put its own watermark on my image?

No. The output is your photo with your watermark and nothing else. Free tiers elsewhere often stamp their own logo onto the result, which is a strange thing for a watermarking tool to do — since processing happens on your device, there is no cost here to recover that way.

How do I make a transparent watermark PNG?

Set the watermark type to Text or Logo, choose PNG as the output format, and the watermark is composited onto your image with its opacity intact. If what you want is the watermark on its own transparent background — a reusable stamp rather than a marked photo — build it as a logo file first, since this tool watermarks photos rather than exporting bare marks.

Can I use this watermark maker on my phone?

Yes. The page works in Chrome for Android and Safari on iOS, including drag-and-drop from the Files app and pasting from the clipboard. Phones have less memory than laptops, so very large batches of high-resolution photos are more reliable in groups of ten or twenty than all at once.

Every ShotEdit tool follows the same rule: your files are processed in your browser and never uploaded.

Need a transparent logo first? Remove the background from your logo.

Working with footage instead? Reduce video file size in your browser.